|
(3 simple steps to send out your first campaign!!)
Step 1 - Creating new mailing list
- Go to 'Lists'
- Click on 'Add' button
- Enter a name for your list in the 'Name of List' field and click 'Add'
- Choose one of the following options to continue:-
- Add Subsciber (add in new subscriber by manually typing in the subscribers details)
- Checked the mailing lists you would like to add the subscriber and ensure that 'Active' is selected in the dropdown box
- Enter the subscriber details into the corresponding fields
- Click on 'Add'
- Import Subscibers (import existing subscribers from file)
- Select the mailing lists you would like to add the subscriber to into from the 'Import Into' box
- Ensure that 'Active' is selected in the 'Import As' dropdown box
- Checked one of the following options to continue:-
- Import from a file:-
- Click on 'Choose...' button
- Find and choose the file that contain subscriber list and click on 'Open'
- Click on 'Import'
- Select the corresponding mapping field from the dropdown box
- Click on 'Import'
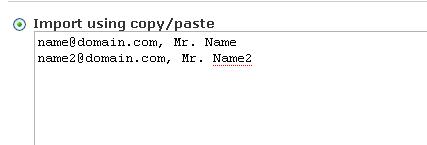
- Import using copy/paste:-
- Enter each subscriber details per line in the text boxFor Example : name@domain.com, Mr. Name;name2@domain.com, Mr. Name2
 - Click on 'Import'
- Select the corresponding mapping field from the dropdown box
- Click on 'Import'
- Manage Lists (going back to mailing list screen)
Step 2 - Creating new campain
- Go to 'Campaigns' , then click on 'Create New' button
- Enter the campaign name and click on 'Next'
- Choose the subscriber list to be used for the campaign and click on 'Next'
- Refer step 3 to continue
Step 3 - Assigning/Creating email message for your campaign
- Choose one of the following option to create new or assign existing email message to your campaign:-
- Choose Blank email
- Highlight 'Blank message' and click 'Next'
- Enter the Subject, From Name and From Email address accordingly into the fields.
- Enter your email message into the text box
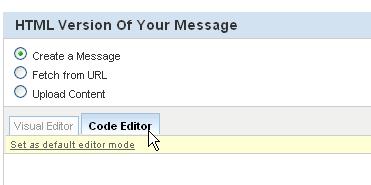
- Shall the email message is in HTML format, click on 'Code Editor' and paste your HTML code into the text box
- Click 'Next'
- To send the campaign out immediately, check 'Send Now' and click 'Finish'
- Shall you would like to schedule the campaign, click 'schedule', then select appropriate date, time from the panel and click 'Finish'
- Click 'Send Now' or 'Finish'
- Choose a Template
- Highlight a template and click 'Next'
- Enter the Subject, From Name and From Email address accordingly into the fields.
- Edit the content shows in the text box
- Click 'Next'
- To send the campaign out immediately, check 'Send Now' and click 'Finish'
- Shall you would like to schedule the campaign, click 'schedule', then select appropriate date, time from the panel and click 'Finish'
- Choose a past campaign
- Click on 'Past campaigns' on left menu
- Choose an existing campaign from the list and click 'Next'
- Enter the Subject, From Name and From Email address accordingly into the fields.
- Edit the content shows in the text box
- Click 'Next'
- To send the campaign out immediately, check 'Send Now' and click 'Finish'
- Shall you would like to schedule the campaign, click 'schedule', then select appropriate date, time from the panel and click 'Finish'
(Additional tips in utilizing the Email Marketing Solution !!)
How to add customize field to the mailing list?
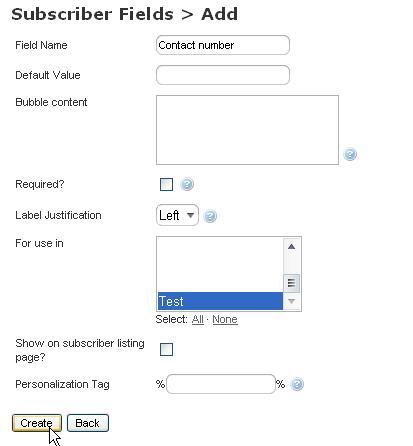
The default fields appear in each mailing list are Email, Last Name and First Name. To add in extra field, please follow the below steps:-
- Go to 'Lists' , then choose 'Manage Subscriber Fields'
- Choose 'Text Field' from the dropdown box and click on 'Add Field'
- Enter corresponding field category into 'Field Name'. For example : Contact number
- Select the mailing list you would like to add this field in 'For use in'
- Click on 'Create'
How to insert image file to the email message?
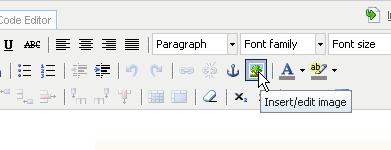
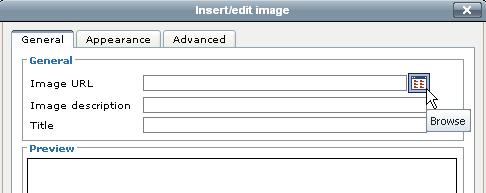
- Click on the 'Insert/edit image' icon on the message editing panel
- Click on 'Browse' icon located on the right side of 'Image URL' field
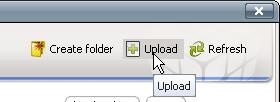
- Click on 'Upload'
- Select the image file from your computer to upload
- Click on 'Upload to server'
- Click on the image file that has been uploaded earlier
- Enter 'Image description' and 'Title' for the image accordingly.
- Click on 'Insert'
How to edit a subscriber's details?
- Go to 'Subscribers', then choose 'Manage Subscribers'
- Click on 'Edit' located on the left side of the subscriber that you wish to edit* To delete the subscriber, click on 'Delete' and 'OK' on the confirmation window
- Edit the corresponded field and click on 'Update'
How to export the subscribers?
- Go to 'Subscribers', then choose 'Export Subscribers'
- Select the file format for the exported file from the drop down menu
- Checked on the field you would like to export
- Select 'All Pages' from the 'How Many:' drop down menu
- Click on 'Export'
How to view the campaign report
- Go to 'Reports' , then choose 'Campaign Reports'
- Click on 'View Reports' on the left side of the campaign
How to setup the bounce management?
- Go to 'Lists' , then choose 'Bounce Settings'
- Click on 'Add' button
- Check one of the following options:-
- No Bounced E-mail Management (Default) * By selecting this option, the bounced back email will be sent to the email address entered in the 'From' field of your campaign
- Pipe from Email Address * This approach will send the bounced back message to the e-mail address entered. However, to pipe the bounced back message to your own script, piping configuration has to be made in your mail server.
- Enter the below information:-
- E-mail Address
The email address which will receive bounced back message and has been configure with the piping function
- Used in Lists
Highlight the user list that you would like to apply this bounce setting (Please ensure that each list is only assign to 1 bounced setting)
- Number of times an address may soft bounce before being removed
Soft bounce implies temporary bounce back such as subscriber's Inbox is full
- Number of times an address may hard bounce before being removed
Hard bounce implies permanent bounce back such as subscriber's email address does not exists is full or network congestion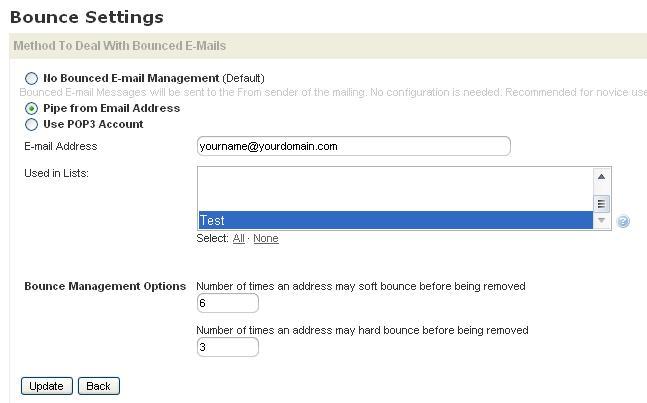
- Use POP3 Account: This approach periodically scans an email account for new messages, reads the messages, then deletes them from the account. Once the messages are read by the system, they are recorded as bounced, so they begin showing up under Campaign Reports for the specific campaign.
- Enter the below information:-
- E-mail Address
The email address which will receive bounced back message
- Used in Lists
Highlight the user list that you would like to apply this bounce setting (Please ensure that each list is only assign to 1 bounced setting)
- POP3 Host
The mail server address
- POP3 Port
The mail server incoming port number (By default is 110)
- POP3 Username
The email address's Username
- POP3 Password
The email address's Password
- Number of emails to process at one time
Quantity of emails in the POP3 mailbox which will scan by the email marketing each time process
- Number of times an address may soft bounce before being removed
Soft bounce implies temporary bounce back such as subscriber's inbox is full
- Number of times an address may hard bounce before being removed
Hard bounce implies permanent bounce back such as subscriber's email address does not exists is full or network congestion
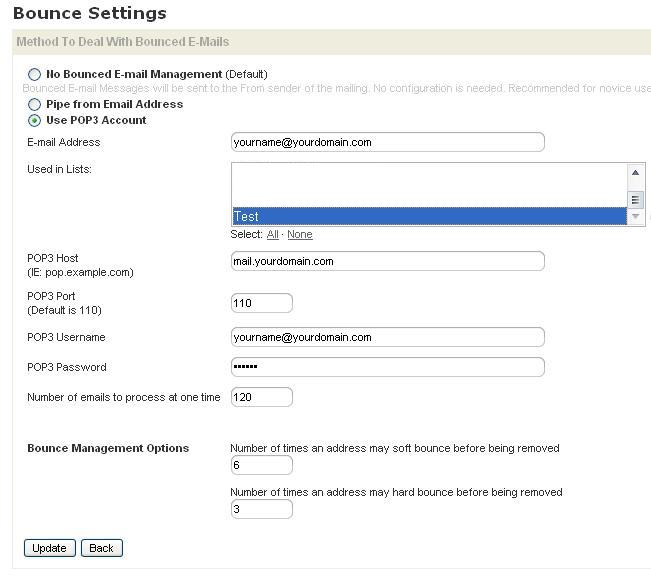
4. Click on 'Update' to apply the the bounced setting
How to integrate the subscription form into your webpage?
In order to integrate the subscription form into your webpage, please refer to the below steps:-
- Go to 'Integration', click on 'Add' button
- Enter the below information:-
- Form Name
Enter the desired name for your form
- Form Options
Choose 'Subscribe Only' shall you would only like to implement subscription form into your webpage
- Lists
Highlight the list you would like the subscriber to be added into
- Fields to request
Checked the field that you would like the subscriber to key in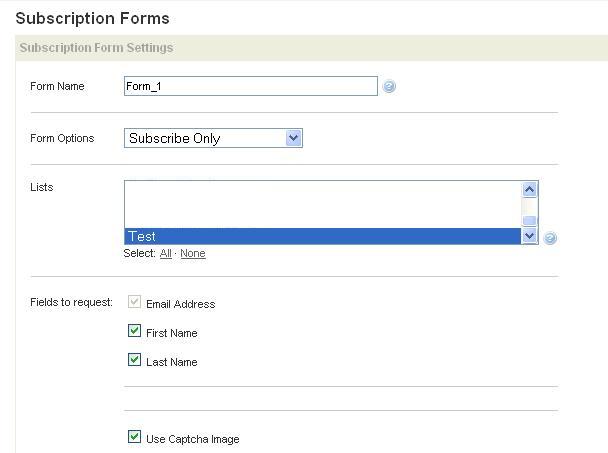
- Click on 'Add & Continue'
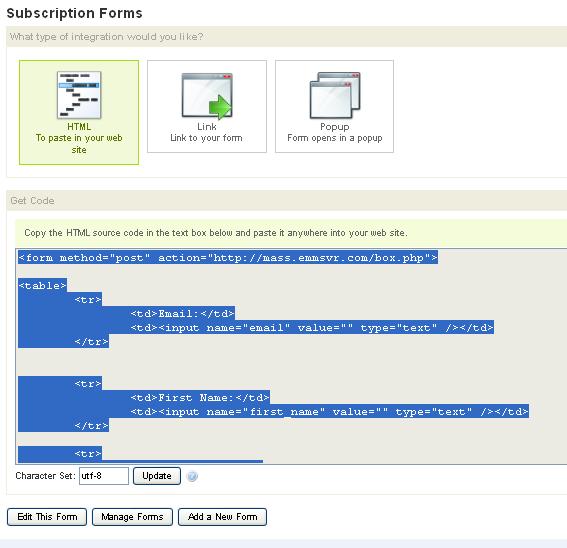
- Choose one of the integration options:-
- HTML - the form will be directly display in your webpage
- Link - A link will be integrated into your webpage whereby client would need to click on the link to access to the form
- Popup - The form will appear in a popup window. A link/button has to be create in webpage to link to the popup window
- Copy the code in the text box and paste it into your webpage source code
Why does my campaign report shows low or zero open rate?
Shall your campaign report is showing low or no open rate, this may be due to the below reasons:-
- Your email is in Text form only
- Recipient does not enable image displaying or click on 'display image' option while opening your email in email client or webmail (for example: Outlook, Gmail and etc.)
- The open/read tracking option has been disable on the 'Summary & Options' screen of campaign creation.
* By default, this option is enabled.

| 


