|
Setup Sender/Reply-To/Bounced Email addresses
- Go to 'Tools' -> 'Configuration & settings'
- Set the Sender/Reply-To/Bounced Email addresses under 'General settings'
Create Mailling List
- Go to 'Mailing lists' -> 'Create new'
- Enter your 'List name' and 'Description'
- Click 'Save'
Importing Subscribers
To add one subscriber:-
- Go to 'Subscribers' -> 'Add - Import' -> 'Add one'
- Enter the subscriber information
- Expand 'Mailing lists' option and checked the lists you would like to add the subscriber to
4. Click 'Add' to finish
To add multiple subscriber:-
- Go to 'Subscribers' -> 'Add - Import' -> 'Add many'
- Choose one of the following import method:-
- Import a list of emails:
- Paste subscriber email addresses like below into the blank field. eg: john@test.com,John Smith, michael@test.com,Michael Smith
- Checked the lists you would like to add the subscriber to
- Click 'Import' to finish
- Import from csv/txt files:
- Click on the file icon located on the right side of 'File name:' field
- Click on 'Choose...'
- Select the CVS or TXT file from your computer to upload
- Click on 'upload'
- Checked the uploaded file and click 'ok'
- Click on 'Start'
- Import from another database:
- Choose the database type from 'Source database connection'
- Enter your database connection details and credentials
- Enter corresponding table and fields name
- Expand 'Select lists to import into' and checked the lists you would like to add the subscriber to
- Click on 'Test -count' to test on the connection to your database
- Click on 'Do the import now' to finish
Create Email
- Go to Newsletters
- Choose your type of email by going to 'Html newsletters' or 'Text newsletters' -> 'Create new'
- Edit the Subject
- Enter/Edit your content via the editing panel
- Click on 'Save' to finish
Create Campaign
- Go to 'Campaigns' and choose 'New campaign
- Enter/choose the below details:-
- Campaign name: your campaign name
- Html newsletter: choose a HTML version of newsletter (may ignore this if you are only sending out text newsletter)
- Text newsletter: choose a Text version of newsletter (may ignore this if you are only sending out HMTL newsletter)
- Send a web page (URL): Enter the URL shall the email content is hosted in your own external server (Example: http://domain.com/email.html)
- Newsletter subject: your newsletter subject
- Select recipients: assign the desired subscribers/lists for this campaign
- Checked on 'Selected lists' and choose lists shall this campaign is not send to all subscribers/lists
- Only to subscribers who prefer: select user group that prefer just a particular format
- Subscribers who confirmed: select user that has been confirmed on subscription
- Mailing filter: select the mail-filtering rule that you would like to apply
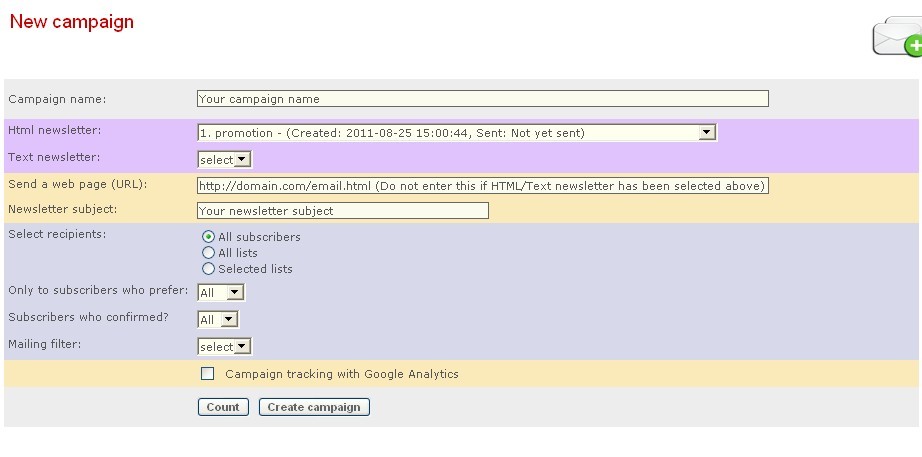
- Click on Create Campaign
- Click here' link to continue
- To send the campaign out immediately, click on 'Start mailing'
- To schedule the campaign, go to 'Tools' -> 'Campaign scheduler' -> 'Create new tasks'
- Select the campaign created and set the date/time to activate the campaign
- Choose whether to 'Send all messages at once' or 'Send in batches and repeat until completed' from 'Sending options' dropdown menu
- Click on 'Create task' to finish
| 
